
This homemade chicken gravy is rich, silky-smooth, and packed with savory flavor that store-bought versions just can’t match. Whether you’re working with drippings from a freshly roasted chicken or starting from scratch with broth, I’ll show you exactly how to create restaurant-quality gravy that will have everyone reaching for seconds!

Why You’ll Love This Chicken Gravy
- Ready in just 15 minutes with basic pantry ingredients
- Perfectly silky texture without any lumps
- Works with or without chicken drippings
- More flavorful than anything from a packet
- Customizable thickness to suit your preference
- Makes everything from mashed potatoes to biscuits taste better
Growing up, my mom always insisted on making gravy from scratch, turning up her nose at those powder packets in the grocery store. I’ll never forget watching her skillfully whisk together golden roux and steaming broth, creating that magical sauce that made our Sunday dinners extra special. Now I’m sharing her secrets (plus a few of my own tricks) to help you master this essential sauce.
The best part? This recipe is incredibly forgiving. Don’t have drippings from a roasted chicken? No problem! I’ll show you how to create deep, rich flavor using chicken broth and my secret weapon – chicken bouillon paste. And if you’re worried about lumps (we’ve all been there!), my foolproof roux method ensures silky-smooth results every single time.
Testing Notes: I’ve made this gravy dozens of times, testing every possible variable to ensure perfect results. The key is getting the roux just right – cook it until it’s light golden brown and smells slightly nutty. This creates the foundation for a gravy that’s rich in both color and flavor. Trust me, once you master this technique, you’ll never go back to store-bought!
Whether you’re preparing a holiday feast or just making a cozy weekend dinner, this chicken gravy recipe will become your go-to. It’s the kind of recipe that makes you feel like a professional chef, even though it’s surprisingly simple to prepare.
Essential Ingredients for Perfect Chicken Gravy
Let me walk you through exactly what you’ll need to make the most flavorful homemade chicken gravy. I’ve tested this recipe countless times to get the perfect balance of ingredients!
- Chicken Drippings: These golden drops of flavor are pure magic – they’re the concentrated juices and fat that collect in the pan while roasting chicken. Don’t worry if you don’t have them though! We can create amazing gravy without them using my alternative method.
- All-Purpose Flour: This is our thickening superhero. When combined with fat, it creates that silky-smooth texture we’re after. I always measure flour using the spoon-and-level method for consistent results.
- Chicken Broth: The backbone of our gravy! Use low-sodium broth so you can control the saltiness. I prefer using homemade stock, but a good-quality store-bought version works beautifully too.
- Chicken Bouillon Paste: My secret weapon when making gravy without drippings! It adds that deep, rich chicken flavor that makes everyone ask for your recipe. Just a teaspoon makes such a difference.
- Salt and Black Pepper: Simple but crucial! Always season gradually and taste as you go. Remember, you can add more but you can’t take it away.
Success Tips for Foolproof Gravy
After making this gravy hundreds of times (seriously!), I’ve discovered some game-changing tricks that guarantee perfect results every time:
- Master the Roux: The key to lump-free gravy is cooking your roux properly. Whisk constantly over medium heat until it turns light golden and smells slightly nutty – usually about 3-4 minutes. This creates the perfect foundation for silky gravy.
- Temperature Matters: Always add warm or room temperature broth to your roux, never cold! Cold liquid hitting hot roux is a recipe for lumps. I keep my broth warming on low heat while making the roux.
- Perfect Your Consistency: If your gravy’s too thick, whisk in warm broth a few tablespoons at a time. Too thin? Mix 1 teaspoon cornstarch with 1 tablespoon cold water and slowly stir it in while the gravy simmers.
- Safety First: When working with hot drippings, pour them away from your body and let them settle for a minute. The fat will rise to the top, making it easy to skim off what you need.
Remember, making gravy is like conducting a little kitchen symphony – timing and technique matter, but with these tips, you’ll be creating smooth, flavorful gravy every single time!
Step-by-Step Guide to Making Perfect Chicken Gravy
Let me walk you through my foolproof method for making the silkiest, most flavorful chicken gravy you’ve ever tasted. I’ve spent years perfecting this technique, and I’m excited to share every detail with you!
Starting with the Drippings (If Using)
- Once your chicken is done roasting, carefully tilt the pan away from you (safety first!) and pour those golden drippings into a clear measuring cup
- Let it rest for about 1 minute – you’ll see the fat naturally rise to the top
- Gently skim off most of the fat with a spoon, leaving the flavorful juices below
Making the Perfect Roux
This is where the magic happens! A properly made roux is the secret to silky-smooth gravy.
- Heat your saucepan over medium heat
- Add ½ cup drippings (or substitute chicken broth)
- Sprinkle in ¼ cup flour while whisking continuously
- Keep whisking until it forms a smooth paste – watch for that gorgeous light golden color to develop
Baker’s Tip: If your mixture looks too greasy, don’t panic! Just sprinkle in a bit more flour, one teaspoon at a time, until you reach that perfect paste consistency.
Creating the Final Gravy
- Gradually pour in 2 cups of warm chicken broth, whisking constantly
- Add ¼ cup additional drippings (or 1 teaspoon bouillon paste)
- Simmer while whisking for 5-8 minutes until it reaches your desired thickness
- Season with salt and pepper to taste
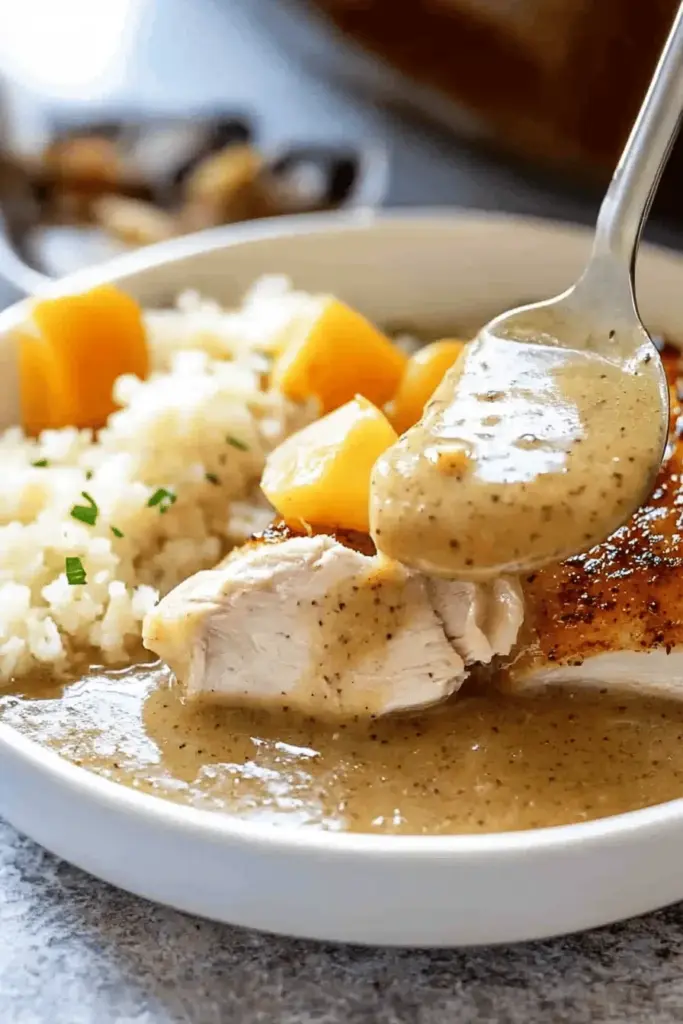
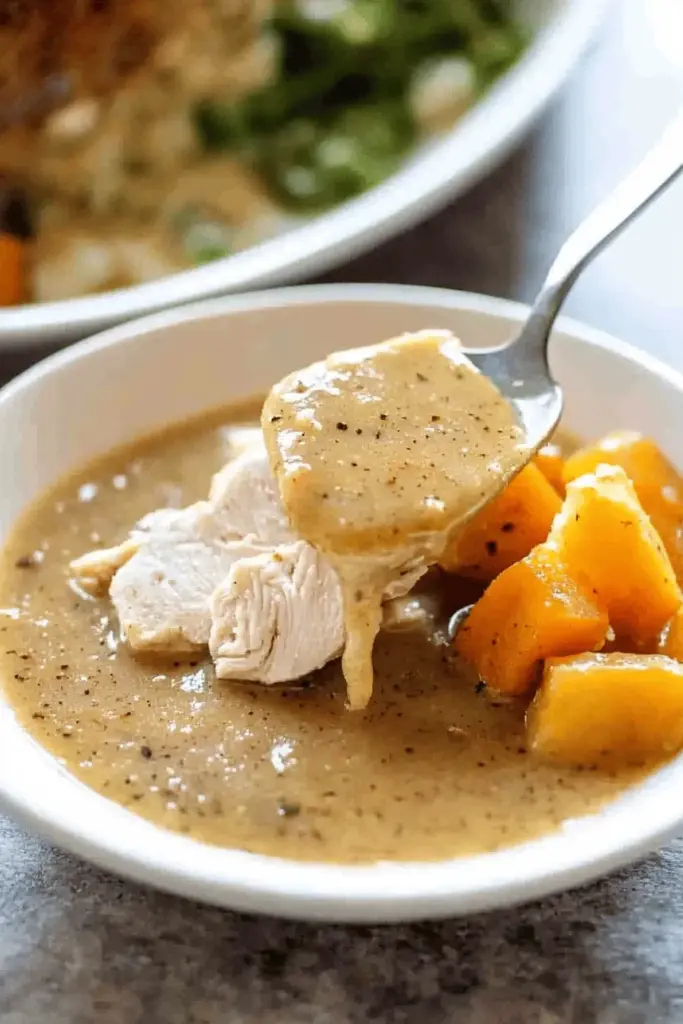
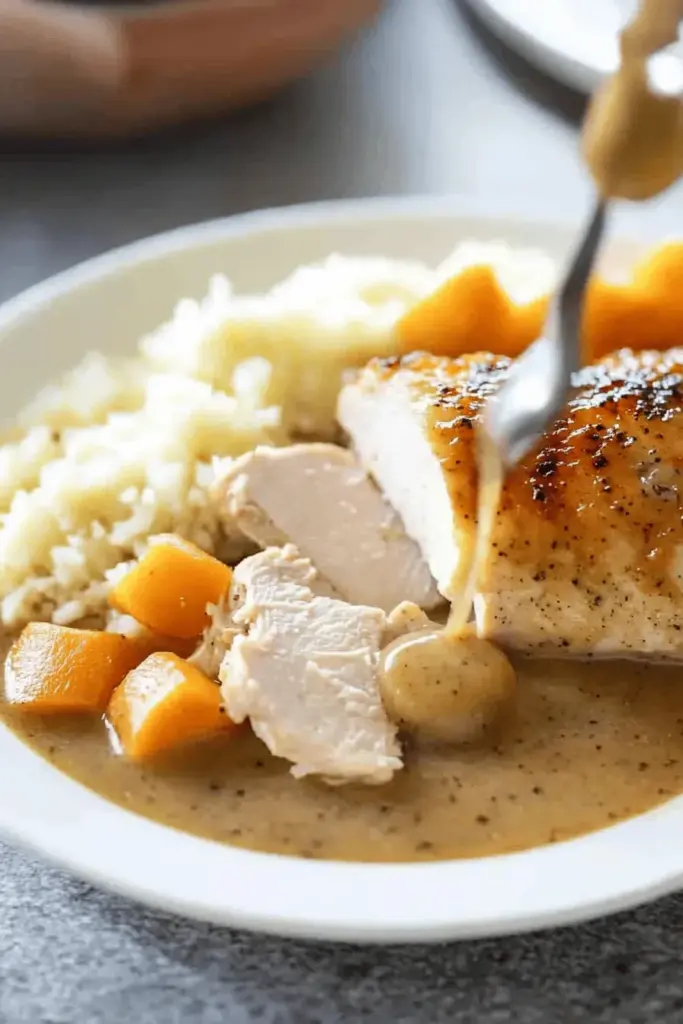
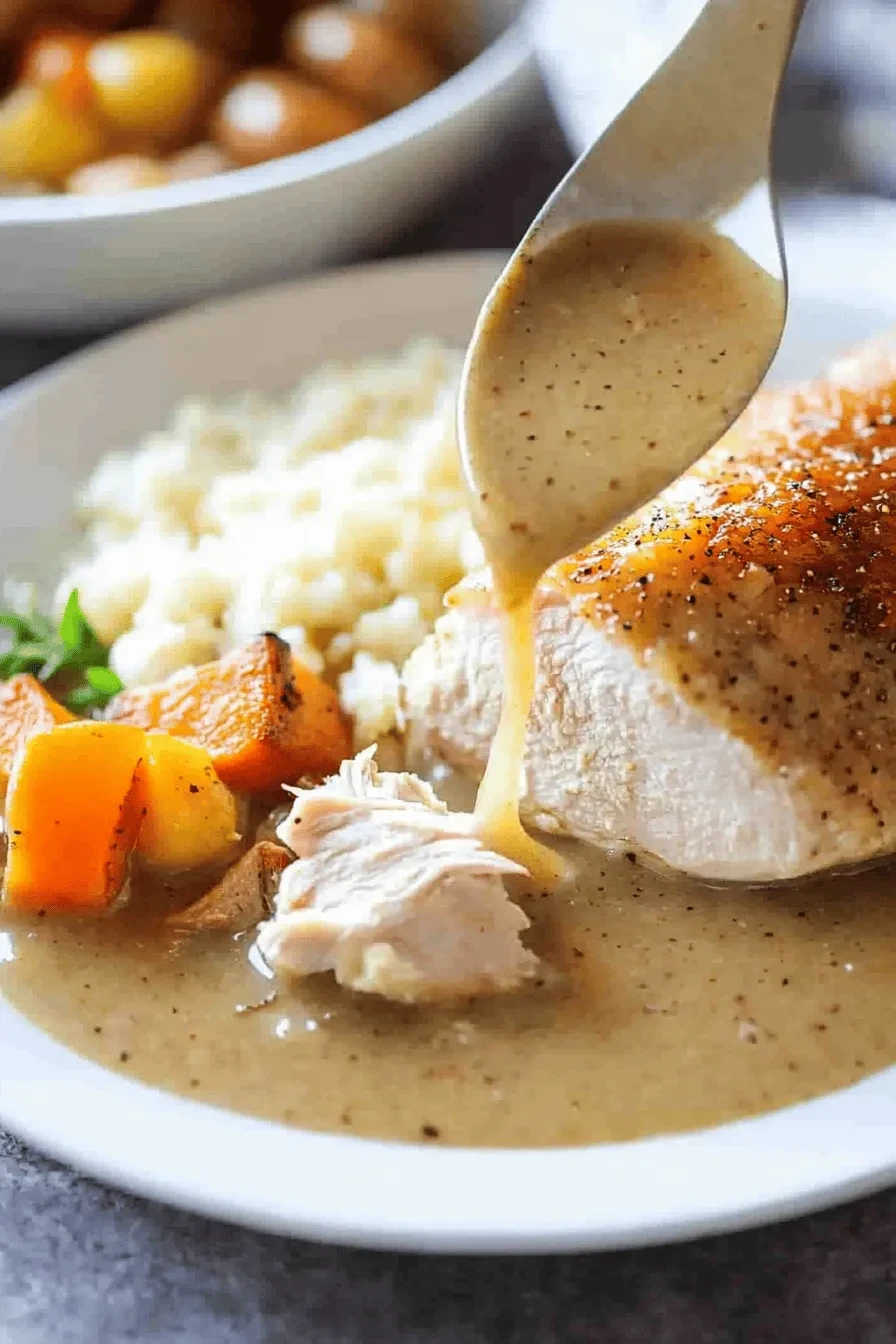
Delicious Ways to Use Your Homemade Gravy
Now that you’ve mastered this gravy recipe, let me share some of my favorite ways to serve it!
Classic Comfort Food Pairings
- Drizzled over hot buttermilk biscuits for the coziest breakfast
- Smothered on mashed potatoes – my personal favorite!
- Alongside roasted chicken and vegetables for Sunday dinner
- Mixed into your favorite casseroles for extra richness
Storage Tips
If you have leftovers (which rarely happens in my house!), here’s how to keep them:
- Refrigerate in an airtight container for up to 2 days
- Freeze for up to 4 months in freezer-safe containers
- To reheat, warm gently on the stovetop, whisking to restore smoothness
Pro Tip: When reheating frozen gravy, let it thaw overnight in the refrigerator first. If it seems too thick, whisk in a splash of warm chicken broth until you reach the perfect consistency.
FAQs & Final Thoughts
You can make this gravy up to 2 days ahead! Just store it in an airtight container in the refrigerator. When ready to serve, reheat gently on the stovetop, whisking occasionally. If it’s too thick, thin it with a splash of warm chicken broth until you reach the perfect consistency.
Lumpy gravy usually happens when cold liquid meets hot roux too quickly. To fix lumpy gravy, strain it through a fine-mesh sieve or blend it with an immersion blender. To prevent lumps, always use warm broth and whisk constantly while adding liquid to your roux.
When making gravy without drippings, chicken bouillon paste becomes your best friend! Start with a butter-based roux instead of drippings, then add warm chicken broth and a teaspoon of bouillon paste. This combination creates rich, deep flavor that tastes just like it was made with drippings.
Yes! Skip the flour and create a cornstarch slurry instead. Mix 1 tablespoon cornstarch with 1 tablespoon cold water for each cup of gravy base. Add it to your simmering broth mixture, whisking constantly until thickened.
Final Thoughts
I absolutely love seeing home cooks master this chicken gravy recipe! There’s something magical about watching that perfect golden roux transform into silky, flavorful gravy. Whether you’re making it for a special Sunday dinner or just jazzing up your weeknight meals, this recipe proves that homemade gravy is absolutely worth the little extra effort.
Remember, practice makes perfect with gravy-making. If your first attempt isn’t restaurant-worthy, don’t give up! Each time you make it, you’ll get a better feel for the right consistency and seasoning. And trust me – once you nail this recipe, your family will beg you to make it again and again.
I’d love to hear how your gravy turns out! Share your success stories or any questions in the comments below. Happy gravy making, friends! 🍗
Pro Tip: Keep a jar of chicken bouillon paste in your pantry – it’s a game-changer for those times when you need to whip up gravy without drippings!
Chicken Gravy
Equipment
- 1 sauce pan large
- 1 liquid measuring cup
- 1 Bowl
Ingredients
- 0.75 cup Drippings from roasted chicken about
- 0.25 cup all-purpose flour
- 2 cups low-sodium chicken broth (or turkey or vegetable broth) (add extra ¾ cup if not using drippings)
- salt and pepper to taste
- 1 teaspoon chicken bouillon paste for flavor if not using drippings
- 1 tablespoon cornstarch
- 1 tablespoon water
Instructions
- If using drippings (optional): When you have taken your chicken out of the oven, pour the liquid and drippings from the pan into a liquid measuring cup or a bowl. (Tip the pan away from your body and be careful not to burn yourself)! Let the drippings sit for a minute, allowing the fat to naturally separate from the rest of the drippings. You will notice that the fat will rise to the top, leaving the drippings and liquid on the bottom. Use a large spoon or ladle to skim (remove most of the fat from the top of the drippings).
- To make the gravy, use a large sauce pan and add ½ cup of drippings (or chicken broth) to the pan.
- Add ¼ cup flour to the pan and whisk together until it makes a smooth paste. (At this point, you’ll need to use a little of your own judgement. You want a pasty consistency. If yours seems a little greasy, add more flour).
- When you have found the right consistency, whisk the mixture slowly over the heat as it begins to brown. You are creating a roux.
- Once you get a nice lightly golden color, add 2 cups of chicken broth and ¼ additional cup of drippings (or 1 teaspoon chicken bouillon paste for flavor if not using drippings).
- Allow the gravy to cook, whisking constantly for about 5 to 8 minutes, or until thickened.
- If the gravy is too thick, add more broth or drippings liquid. If the gravy is too thin after cooking for 10 minutes, add a cornstarch slurry (mix 1 tablespoon of cornstarch with 1 tablespoon of water and then add to the gravy).
- Once you are happy with the consistency of your gravy, season with pepper (and salt if needeto taste, and enjoy!
- Store leftover gravy covered, in the refrigerator.
Leave a Reply